Unleashing Creativity with the Piano Roll Arpeggiator in FL Studio
May 18, 2023As music creators, we're often looking for ways to introduce new and interesting elements into our music. The piano roll arpeggiator in FL Studio is one such tool that can add complex melodies and rhythms to your music with relative ease. Unlike the arpeggiator in the Channel Settings, this tool is not a real-time effect. However, its strength lies in its customization and control capabilities, allowing for intricate arpeggio patterns. Let's explore how this tool works and how it can enhance your music production process.
Navigating the Arpeggiator's Controls
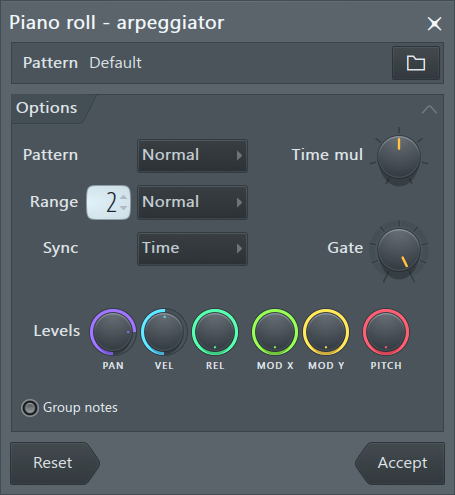
The Arpeggiator tool interface is packed with different options that let you modify your arpeggio patterns.
The Pattern (Browse) option, for instance, allows you to load an FL Studio Score file (*.fsc) to be used as an arpeggiator pattern. This gives you the freedom to create unique arpeggio sequences based on your project's needs.

In the Options section, you can find several customization settings. These include the Pattern mode (Normal, Flip Vertical, Alternate), Time multiplication (adjusts the speed of the arpeggio), Range (sets the arpeggiator range in octaves), and Sync (determines the end of the arpeggiator loop). Additionally, you can use the Gate setting to create a gating effect by shortening the arpeggiated notes.
Moreover, using the Levels control, you can mix the per-note levels (pan, volume, pitch, etc.) of the current score with those of the loaded pattern.
The Group notes feature lets you group chopped notes, making it easier to manage and manipulate the individual segments of your arpeggio.
Finally, the Reset and Accept action buttons allow you to restore the default state or accept changes and close the tool, respectively.
Creating Your Arpeggiator / Chop Patterns
FL Studio's Piano roll Arpeggiator interprets regular Piano roll scores in a special way to fit the arpeggiator tool's purpose. The note's position in the pattern is considered relative to the note being arpeggiated. For instance, C5 denotes the arpeggiated note, whereas C#5 indicates the note above it.
To make things even more intuitive, notes that cover the whole pattern are deemed "sustained notes" and are left untouched by the arpeggiator.
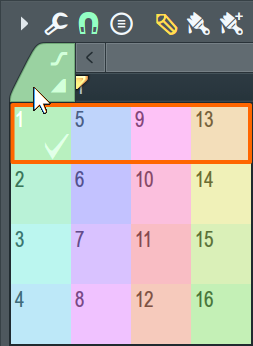
Colors play an essential role in the arpeggiator pattern design. They help indicate different elements within the pattern. The first four colors in the selector are used in chopper/arp scores. The color Blue (5) represents a note that will not be chopped, while Yellow (13) indicates the length of the pattern.

Implementing the Piano Roll Arpeggiator: A Use Case
Now, let's illustrate how to employ the Piano roll Arpeggiator using a chord progression example.
Firstly, open the Piano Roll for the channel containing the chord progression. From the Tools menu, select Arpeggiate. Choose a predefined arpeggiator pattern or create a unique one by selecting the Normal pattern and making modifications.
Next, select between Normal, Flip, and Alternate patterns. Use the Time multiplication knob to stretch or compress the arpeggiator pattern, thereby adjusting the speed of the arpeggiated chord.
Finally, play the arpeggiator sequence (pattern) using a MIDI keyboard note by note. This method offers a hands-on, interactive way to experiment with the arpeggiated sequence.

Remember, creativity comes from exploration. Feel free to experiment with different arpeggiator patterns, directions, and speeds to create unique and captivating arpeggios.
Happy music-making!

